Add Google Adsense to your Single Page Web Application
There is a simple but intelligent way to monetize your website by adding Google AdSense. Your idea, effort, and design thinking will be getting paid. In this blog, I am going to discuss a few essential points that I learned by myself regarding the Google Adsense program and enabling it for my website.
Google AdSense can be added on any website. But ...
I would recommend, adsense should be added only those website which are not selling any product.
What is Google AdSense?
- Google Adsenseis an advertising network run by google. It's a freeway for websites to make money by displaying Google advertisements on their sites.
Create a Single-page Application & get access to the Google Adsense portal
Currently, I am using an angular application to install/add Adsense. An angular application has been created using ng-CLI (ng new Adsense-demo) and built the application.
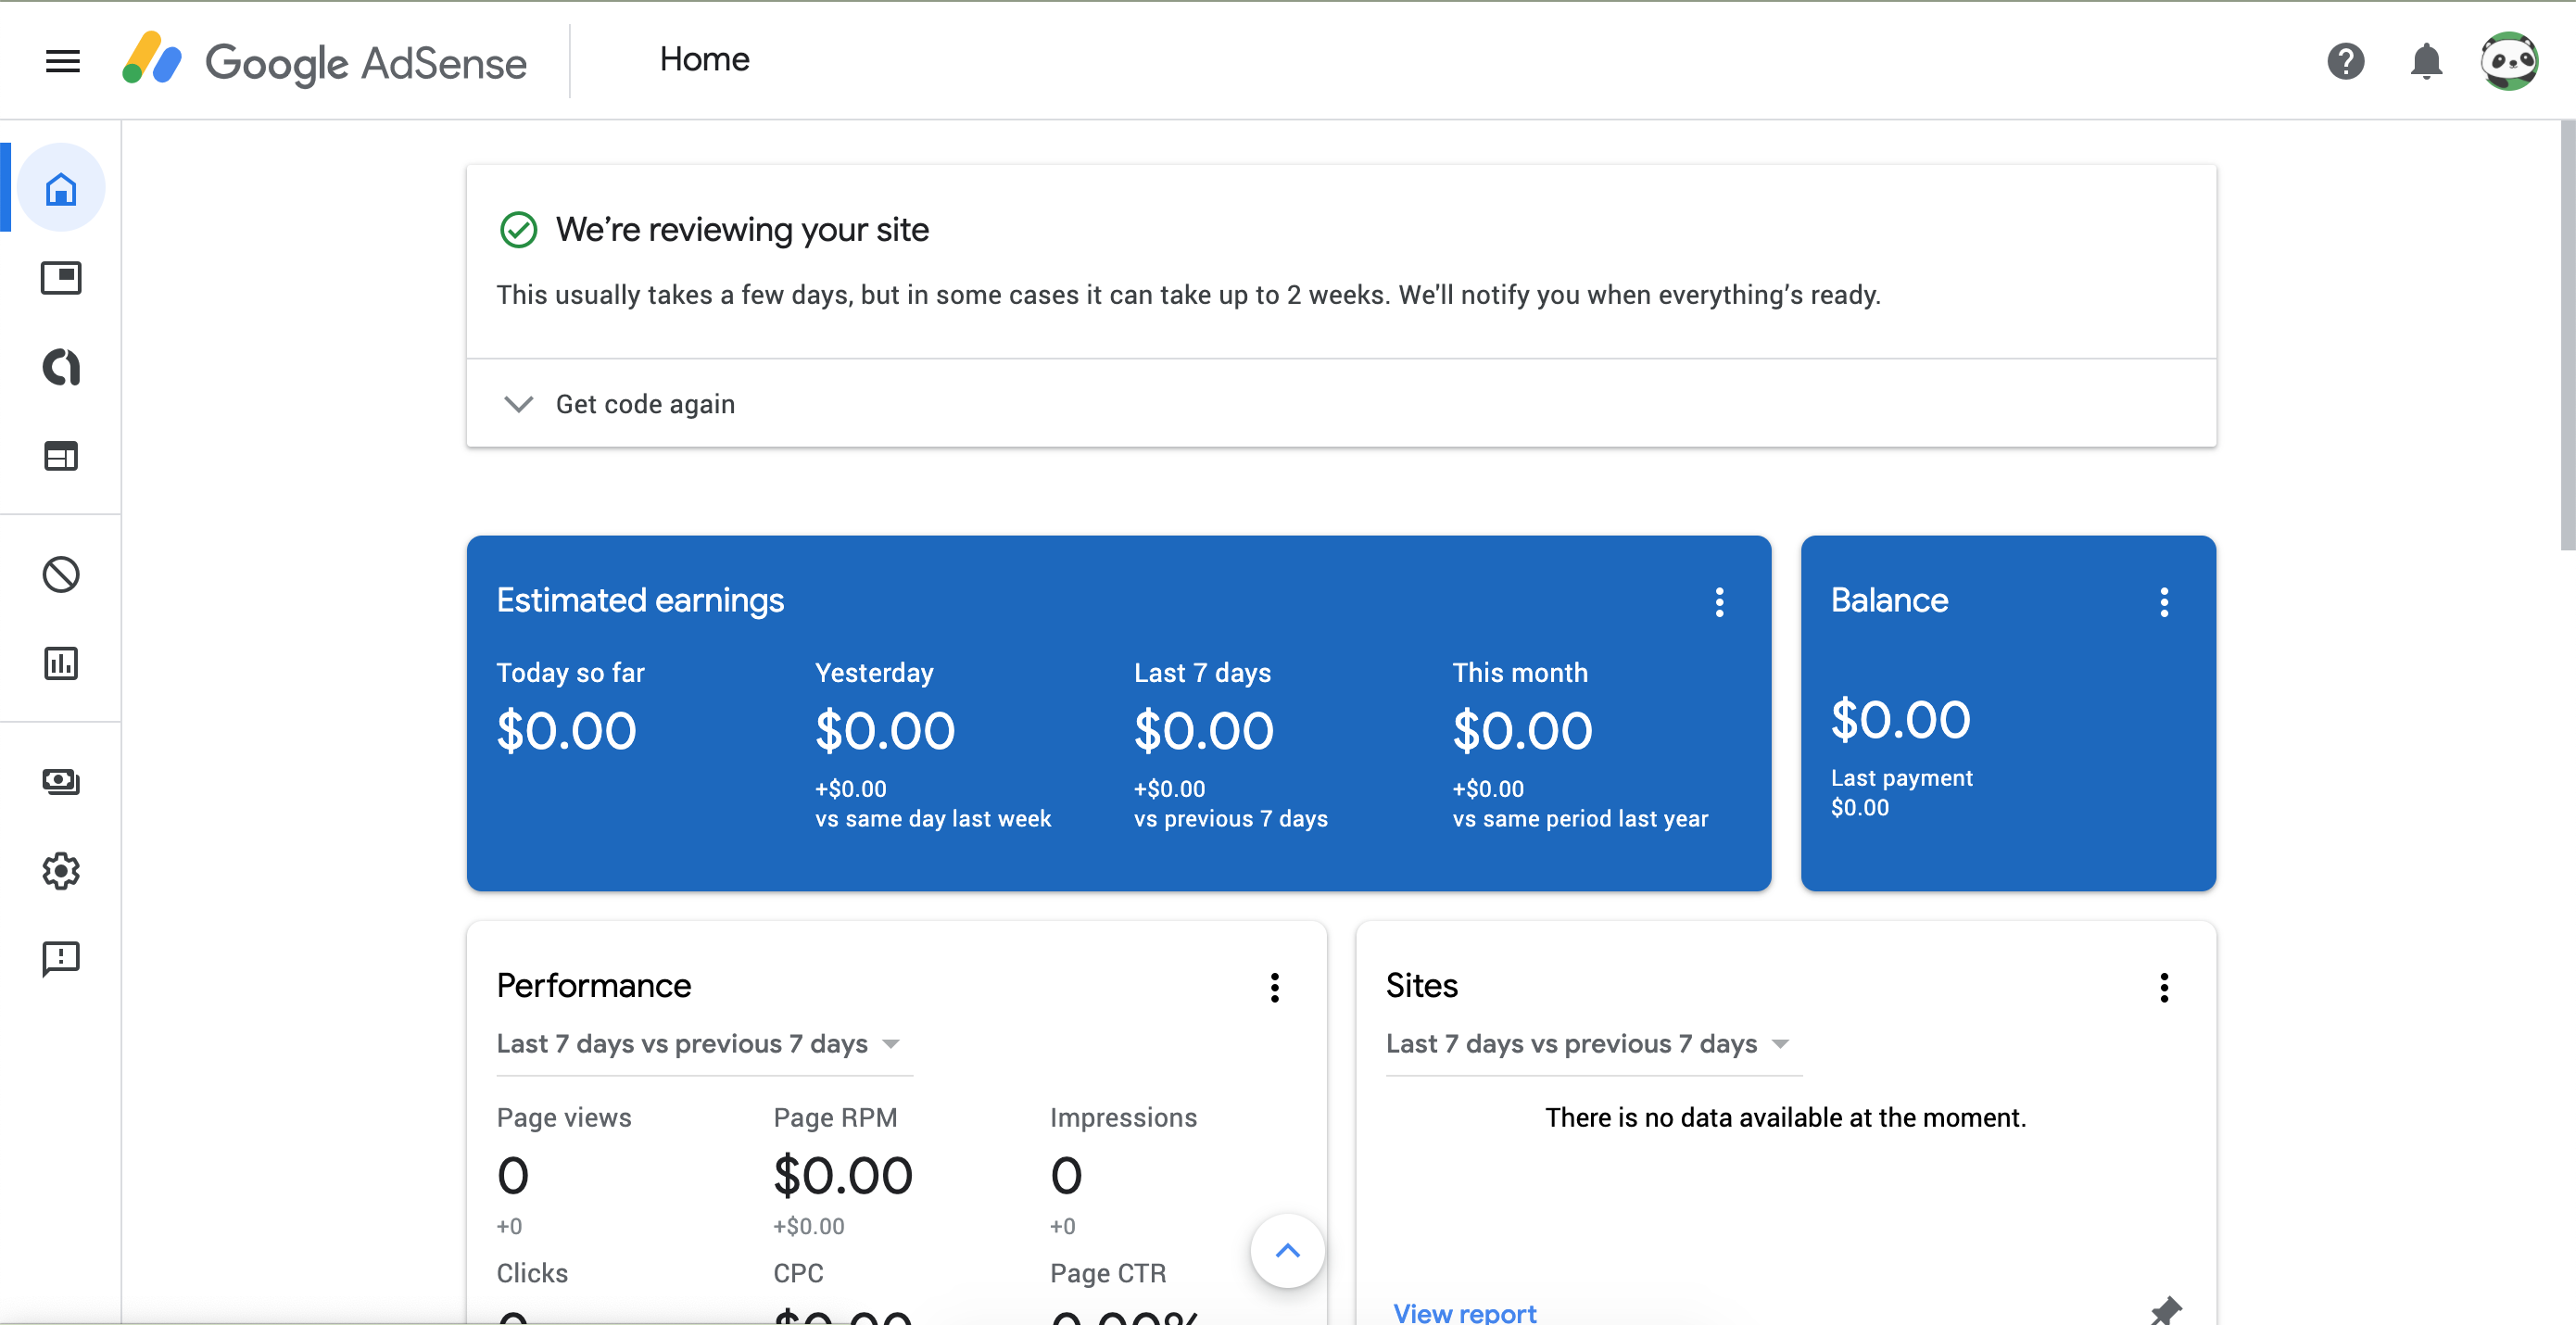
Then sign in to the Google Adsense portal, and you will get an AdSense code that needs to be placed on the index.html page in the head section. Once done you need to deploy the application in your custom domain (HTTPS / SSL certificate embedded) and verify the code in the Adsense account. You will see your application status is 'Under review' like the below screenshot.
Navigate to Account > Settings menu in the AdSense portal, and update 'Account Information & 'Personal Settings' both and verify once again before leaving the page.
Check your site presence in Google Search Results (Configure SEO for your Application)
Now, it's time to enable your application to google search results. There is two way to configure your application visibility to google and for angular, there is a library called Angular Universal that takes care of your search engine optimization functionality.
If you are using Server Side Rendering (SSR), you do need to run a server in a hosting environment. Let's say, I am using AWS to host my application. So, I do need to run EC2 or lambda function to be configured with Nginx and run the application in the container to leverage SEO. The process is a bit costly as you need to run an EC2 container at all time.
You can also implement prerendering functionality using Angular Universal. And the output dist folder will have all route paths and a static HTML file will be placed there. In that case, the application performance will be high, and the application can be hosted statically using the S3 bucket under the AWS cloud.
There are a couple of blogs, I had written earlier. If you are interested to learn about Angular Universal and prerender configuration, you can follow the below links for more details.
Adsense Error Details or Warnings, Detail Explanation & workaround solutions
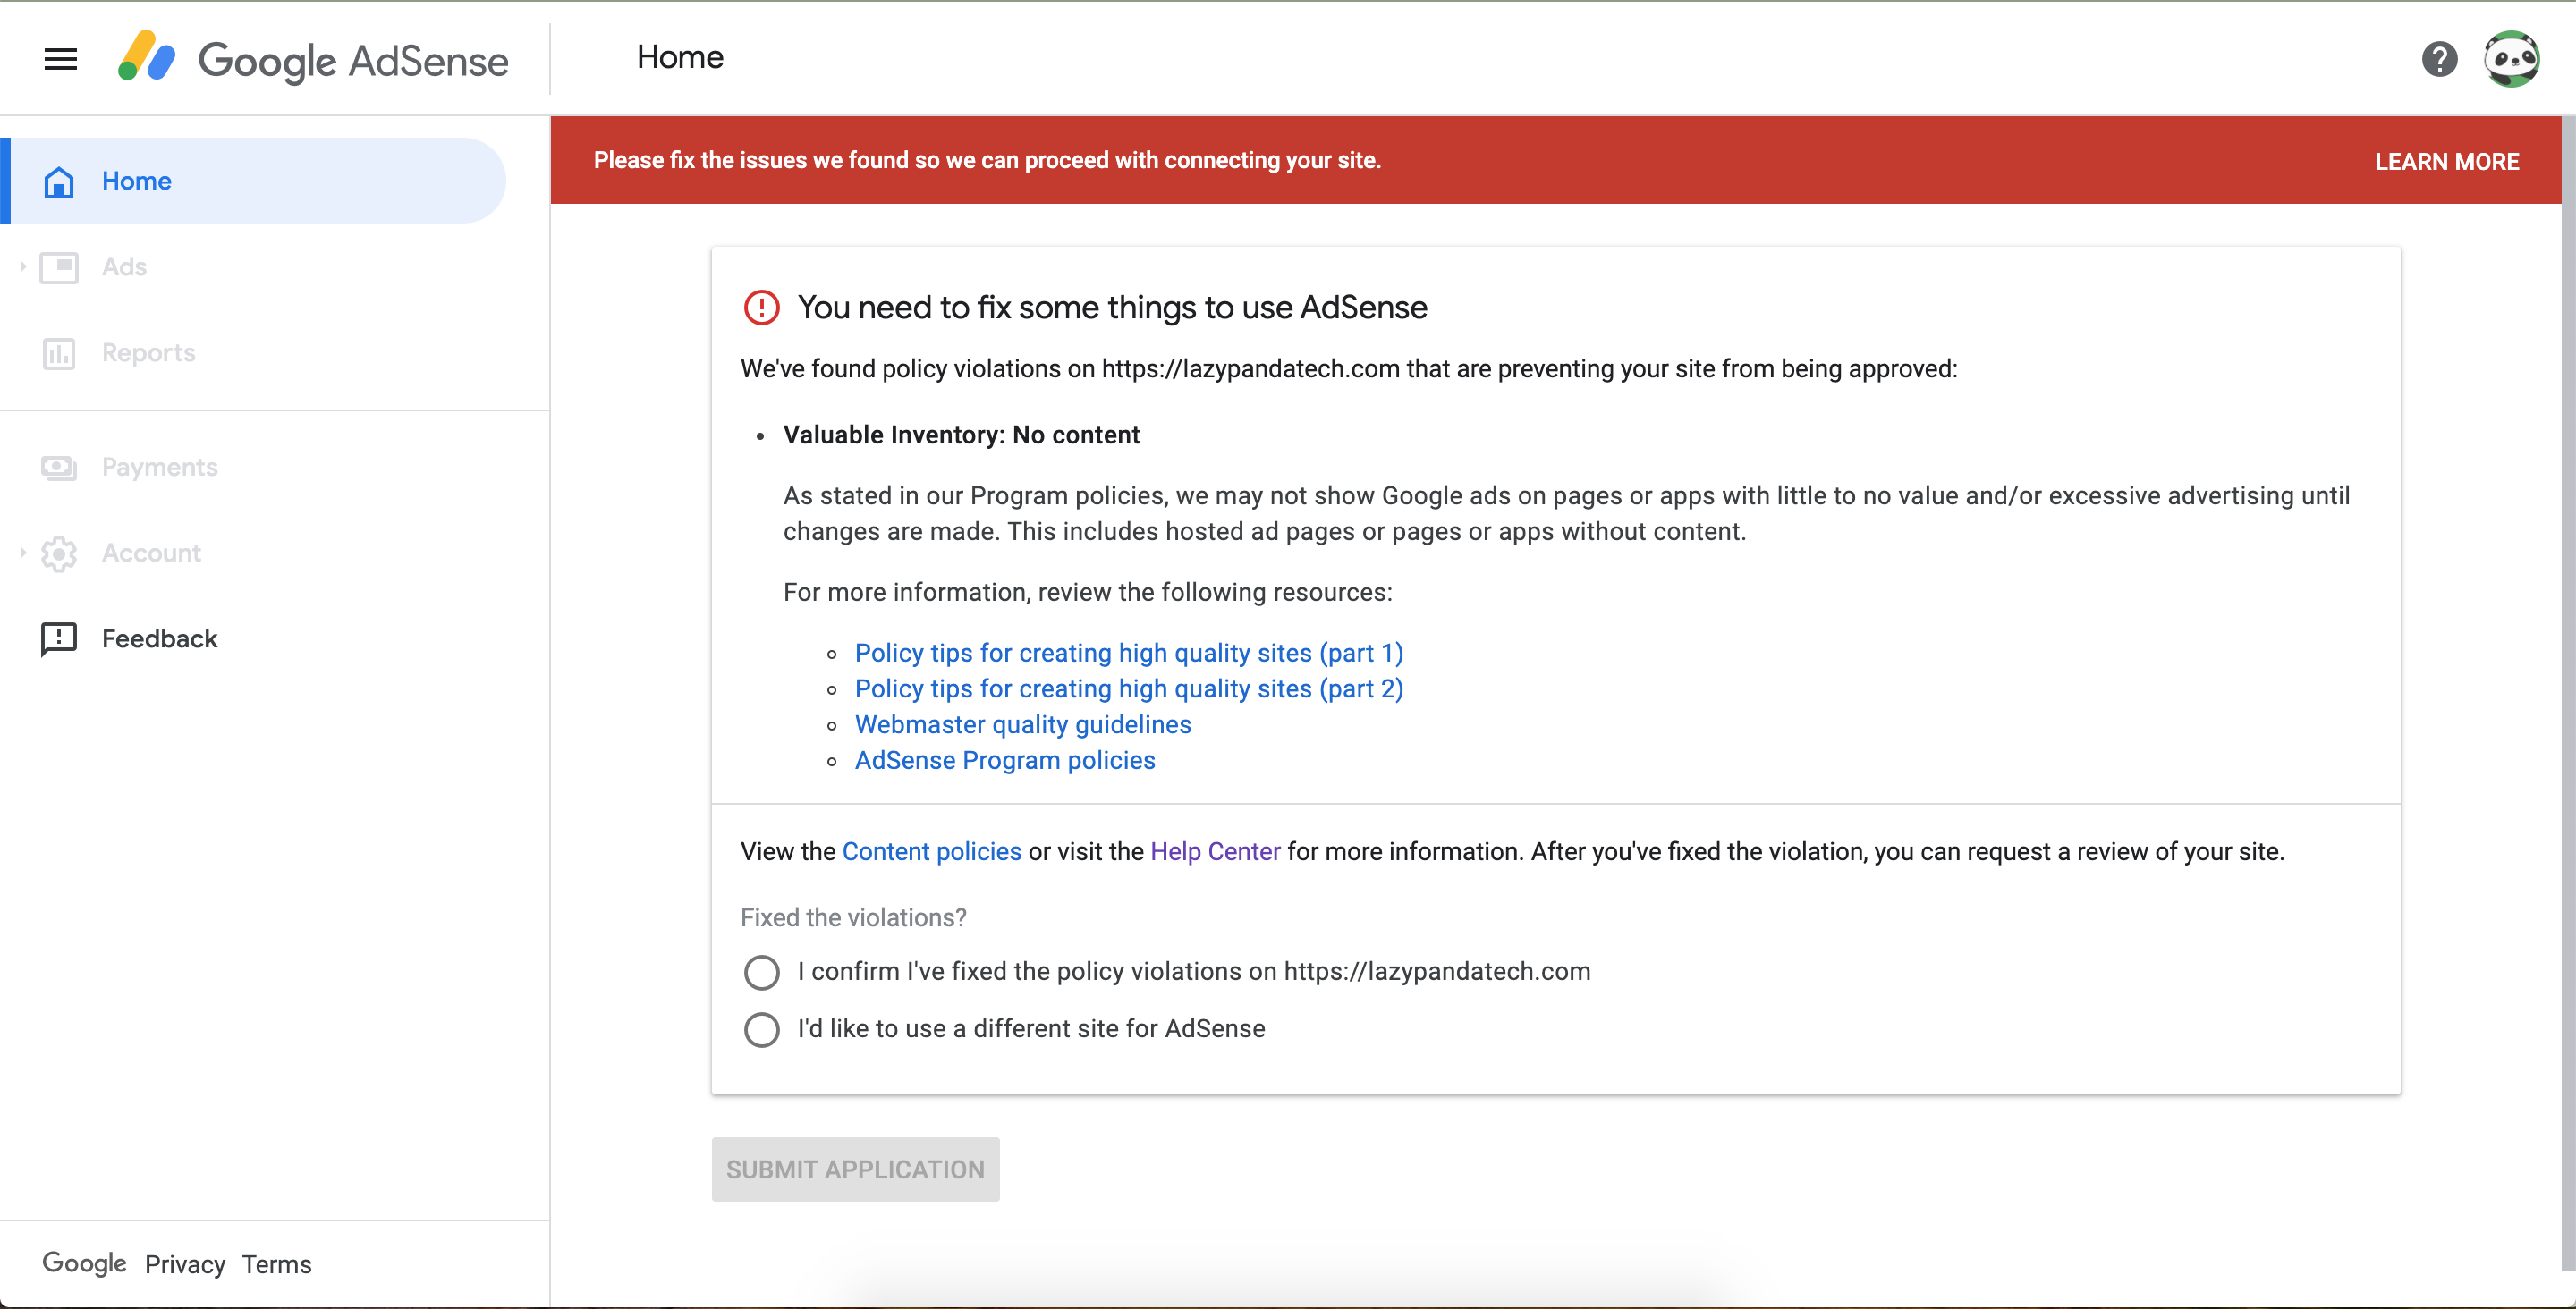
Once your web application is ready for applying to AdSense, you might face rejection from Adsense due to many reasons like below-
There could be many more other reasons not to get AdSense approval, like
Looks like your site https://lazypandatech.com wasn't ready for AdSense because it didn't have enough content.
Valuable inventory: Scraped content
Site down or unavailable
Valuable inventory: Under construction
Site Behavior: Navigation
etc
If you ever received any note like the above from Google Adsense, then you definitely need to fix something in your web portal before applying it again. There are few points you have had to keep in mind before applying for Adsense. Let me explain those, which I have self-learned after getting so many rejections at least 7 - 8 times.
AdSense is contextual, which means you have to write textual articles with more words. A lot of images, and streaming videos will not help much there.
While writing textual content, keeping in mind what you know or read somewhere, write the same in your own language. So, Copy Paste will not help there too. Spelling or grammatical mistakes should be avoided. [Though my first language is not English, still I am trying my best to write my idea. Please mind ignoring the human error.]
The page navigation should not be complex and none of the page navigation should not show any 404 not found error. (should not be 404 or 400 series error code)
Your application should be visible in google search results.
Minimum 10 users per day visit.
If you are making any Ajax call from your application to load your HTML content, make sure all Rest API works properly.
If you are using AWS to host your application, good to have CloudFront and set up an error page & Invalidation accordingly. So that the web pages are clean and up to date across all servers.
Good to have a privacy page, though I don't have it yet.
If any path is not there, show some proper message to the user.
Last but not least, if you are following all the above points, you do need to have the patience to get Adsense Approval.
Auto Ads Or Manual Ads: What to set up?
After approving your AdSense account, you need to add the ads.txt file to your project root directory. ads.txt file you will get from the Google AdSense portal itself. It will take some time to get it acknowledged by google.
For Angular your need to place the ads.txt file under the src folder and update the angular.json file assets key value, like below -
You can choose manual ads or enable auto ads for your portal.
For Manual Ads, you need to create ad types like in-display ads, in-feed ads, in-article ads under the By Ad Unit category or segment. You will get individual JavaScript code snippets, and to be added to the HTML page. But if you are using angular / react then, I would suggest, creating a separate component for ads of each type and place that component directive to the page component HTML file. So the code will be clean and reusable and you have proper control over your ads, it will never mess up your page design and will be placed where you wanted to place it.
For Auto Ads, you need to add JavaScript code to any page and allow google to search the best position for ads. Based on artificial intelligence, Google will place ads.
In my understanding, Auto Ads are good than Manual Ads, as few screens, I might choose only 2 or 3 manual ads to show as I want to clean my content visible properly. But Auto ads will check the place, if required, it will place ads 2 times or more than 2 times as well as it can understand where the user clicks much and what area user is focusing more in my content, and only on that place google add its ad. So in that case, the auto ad could be good. But after all it's all your choice.
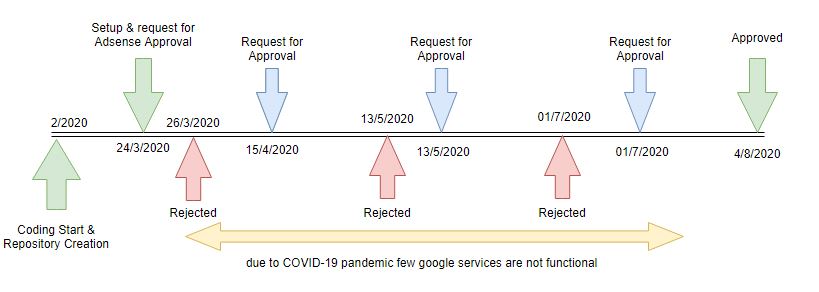
Timeline: Coding start, Request for Adsense approval, Rejection and Rejections finally Approval
If you could count the time and month, I have been waiting a long time to get approval and I keep working on my blog. So keeping patience and focus on the goal is really important. When I got the final email from google that my account has been approved, I was really happy. My first milestone has been achieved. After Adsense approval, it takes another 2 -3 days to show the first ad on my web application.
How to add Google Adsense script dynamically inside of your article
To understand more on this you can follow the below article.
Loading comments...