Lazy Panda

Developer

Posts
57
Comments
48
Likes
76
Posts
57
Comments
48
Likes
76
sidebar

SEO Enablement to an Angular application

I am assuming that you are building your first website for all users across the world. Maybe you are building it, for education/business/marketing whatever it is, but once done, you need to see users come to your application and surf the content. To attract common users, your simple domain name is not enough to encourage users to surf your application, after all, it is not Google, Facebook, Microsoft, Apple, etc. We need to depend on their service to bring our application to the common user's eye.

We need to enable few features and maintain few principles to add our application under search engine’s index. Now depending upon the parameters, token, keywords the index rank will go up and down. Let’s see how we can do it step by step.


Step 1: Configure your sitemap.xml file and robots.txt file

You can include all your external public access URLs to your sitemap.xml file so that search engines can understand the existence of that page and can crawl the page. You can create it from here as well. It should have the following structure like below -

<?xml version="1.0" encoding="UTF-8"?>

<urlset xmlns="http://www.sitemaps.org/schemas/sitemap/0.9" xmlns:image="http://www.google.com/schemas/sitemap-image/1.1">

<url>

<loc>https://lazypandatech.com/</loc>

<changefreq>weekly</changefreq>

<priority>0.8</priority>

<lastmod>2020-03-24T11:01:25+00:00</lastmod>

<image:image>

<image:loc>image-link</image:loc>

<image:title>Home</image:title>

</image:image>

</url>

</urlset>


robots.txt file is also very important to configure. It tells search engine bot which page to crawl and which are not. Using that you can restrict to crawl of a certain directory of your website.

How robots.txt looks like -

Sitemap: https://lazypandatech.com/sitemap.xml
User-agent: *
Disallow: /admin/

Step 2: Try not to use deep links

Deep links mean, URLs with #, like www.your-site.com/#/home. Those are hard to get indexed. So, while creating routing, try to use a simple path for your page. And do the following change in your routing module.

Example: www.your-site.com/blog/ios/layout

RouterModule.forRoot(routes,

      {

        scrollPositionRestoration: 'enabled',

        anchorScrolling: 'enabled',

        useHash: false,

        enableTracing: false

      })


Step 3: Try not to hide content using *ngIf

Try not to use ngIf to hide and show content on your HTML page. Instead, you can leverage CSS functionality to hide & show, like below

.hide {

     display: none;

}

.show {

     display: block

}


Step 4: Try not to use “Virtual Anchors”

Many applications use the following line to navigate from one page to another page.

this.router.navigate([‘/home’]);

Please use a simple anchor tag (<a>) or routerLink to navigate your page. And you can add page navigation restrictions based on guard service.


Step 5: Headings are important too

Heading are important for search engine crawler. Every page should have a different title.

Please note – Components that include a heading tag should not be arranged in such a way that <h1> appears inside <h2>.


Step 6: Include Meta tags for your page

@ngx-meta one of the good, angular libraries can be used to include / update tags dynamically.

https://www.npmjs.com/package/@ngx-meta/core

Please go through the link and description to add a meta tag in your application. Also, you can use angular provided Meta service as well to add/update/delete meta tags. like below -

import { Meta } from '@angular/platform-browser';


// update tags based on particular blog

// general

this.metaTagService.updateTag({ name: 'author', content: 'Lazy Panda' });

this.metaTagService.updateTag({ name: 'sitemap', type: 'application/xml', content: 'https://lazypandatech.com/sitemap.xml' });

this.metaTagService.updateTag({ name: 'googlebot', content: 'index/follow' });

this.metaTagService.updateTag({ name: 'theme-color', content: '#59ab64' });

this.metaTagService.updateTag({ name: 'msapplication-navbutton-color', content: '#59ab64' });

this.metaTagService.updateTag({ name: 'apple-mobile-web-app-status-bar-style', content: '#59ab64' });


// Schema.org markup for Google+

this.metaTagService.updateTag({ name: 'name', content: title });

this.metaTagService.updateTag({ name: 'description', content: description });

this.metaTagService.updateTag({ name: 'article:modified_time', content: new Date().toISOString() });

this.metaTagService.updateTag({ name: 'article:author', content: 'https://www.facebook.com/sudiptapossible/' });

this.metaTagService.updateTag({ name: 'article:publisher', content: 'https://www.facebook.com/Lazy-Panda-Tech-108217420821637' });


// markup for facebook

this.metaTagService.updateTag({ name: 'og:title', content: title });

this.metaTagService.updateTag({ name: 'og:description', content: description });

this.metaTagService.updateTag({ name: 'description', content: description });

this.metaTagService.updateTag({ name: 'og:type', content: 'blog' });

this.metaTagService.updateTag({ name: 'og:url', content: url });

this.metaTagService.updateTag({ name: 'og:keywords', content: keyWords });

this.metaTagService.updateTag({ name: 'og:site_name', content: 'LazyPandaTech' });

this.metaTagService.updateTag({ name: 'og:locale', content: 'en_US' });


// markup for twitter

this.metaTagService.updateTag({ name: 'twitter:card', content: 'LazyPandaTech' });

this.metaTagService.updateTag({ name: 'twitter:title', content: title });

this.metaTagService.updateTag({ name: 'twitter:description', content: description });

this.metaTagService.updateTag({ name: 'twitter:creator', content: 'Lazy Panda' });


And common tags can be added to index.html page as well.

<meta property="og:type" content="article">

<meta name="robots" content="index, follow">

Also, you can add your site-verification id to your HTML. In my case, Google was my site verification provider, so I have added the following line as well. 

<meta name="google-site-verification" content="id-goes-here" />

Note: Setting up proper meta tags on your page will help google show the title, URL, and description of your page correctly in its search result. 


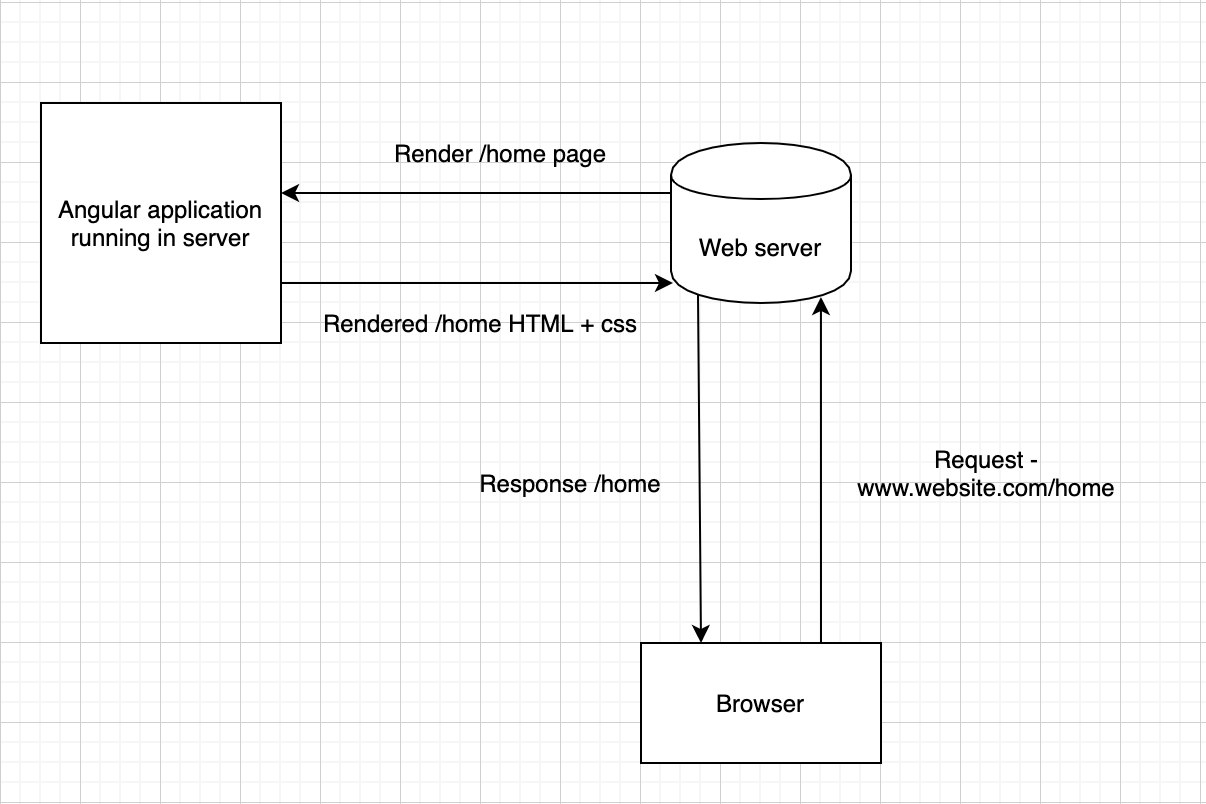
Step 7: Server-side rendering Using Angular Universal

As angular is a client-side application and it requires downloading the application bundle to load the DOM, and the search engine crawler will not be able to find the content as those are not loaded yet. To overcome this problem, serving the application in a server-rendered form. Angular Universal is the best to use it.

angular-universal

Why use Angular Universal?

  • If your application is targeting on Google Search engine, then it might not need, as google search crawl the javascript. But other search engines and social sites will be required server-side rendering to crawl your page for indexing.

Migrating an existing angular Application to a Universal Angular application:

1. Install the following node module

ng add @nguniversal/express-engine (It will update all your code automatically.)

2. Once the installation is done, please run the following command to serve your application in http://localhost:4000

npm run build:ssr && npm run serve:ssr

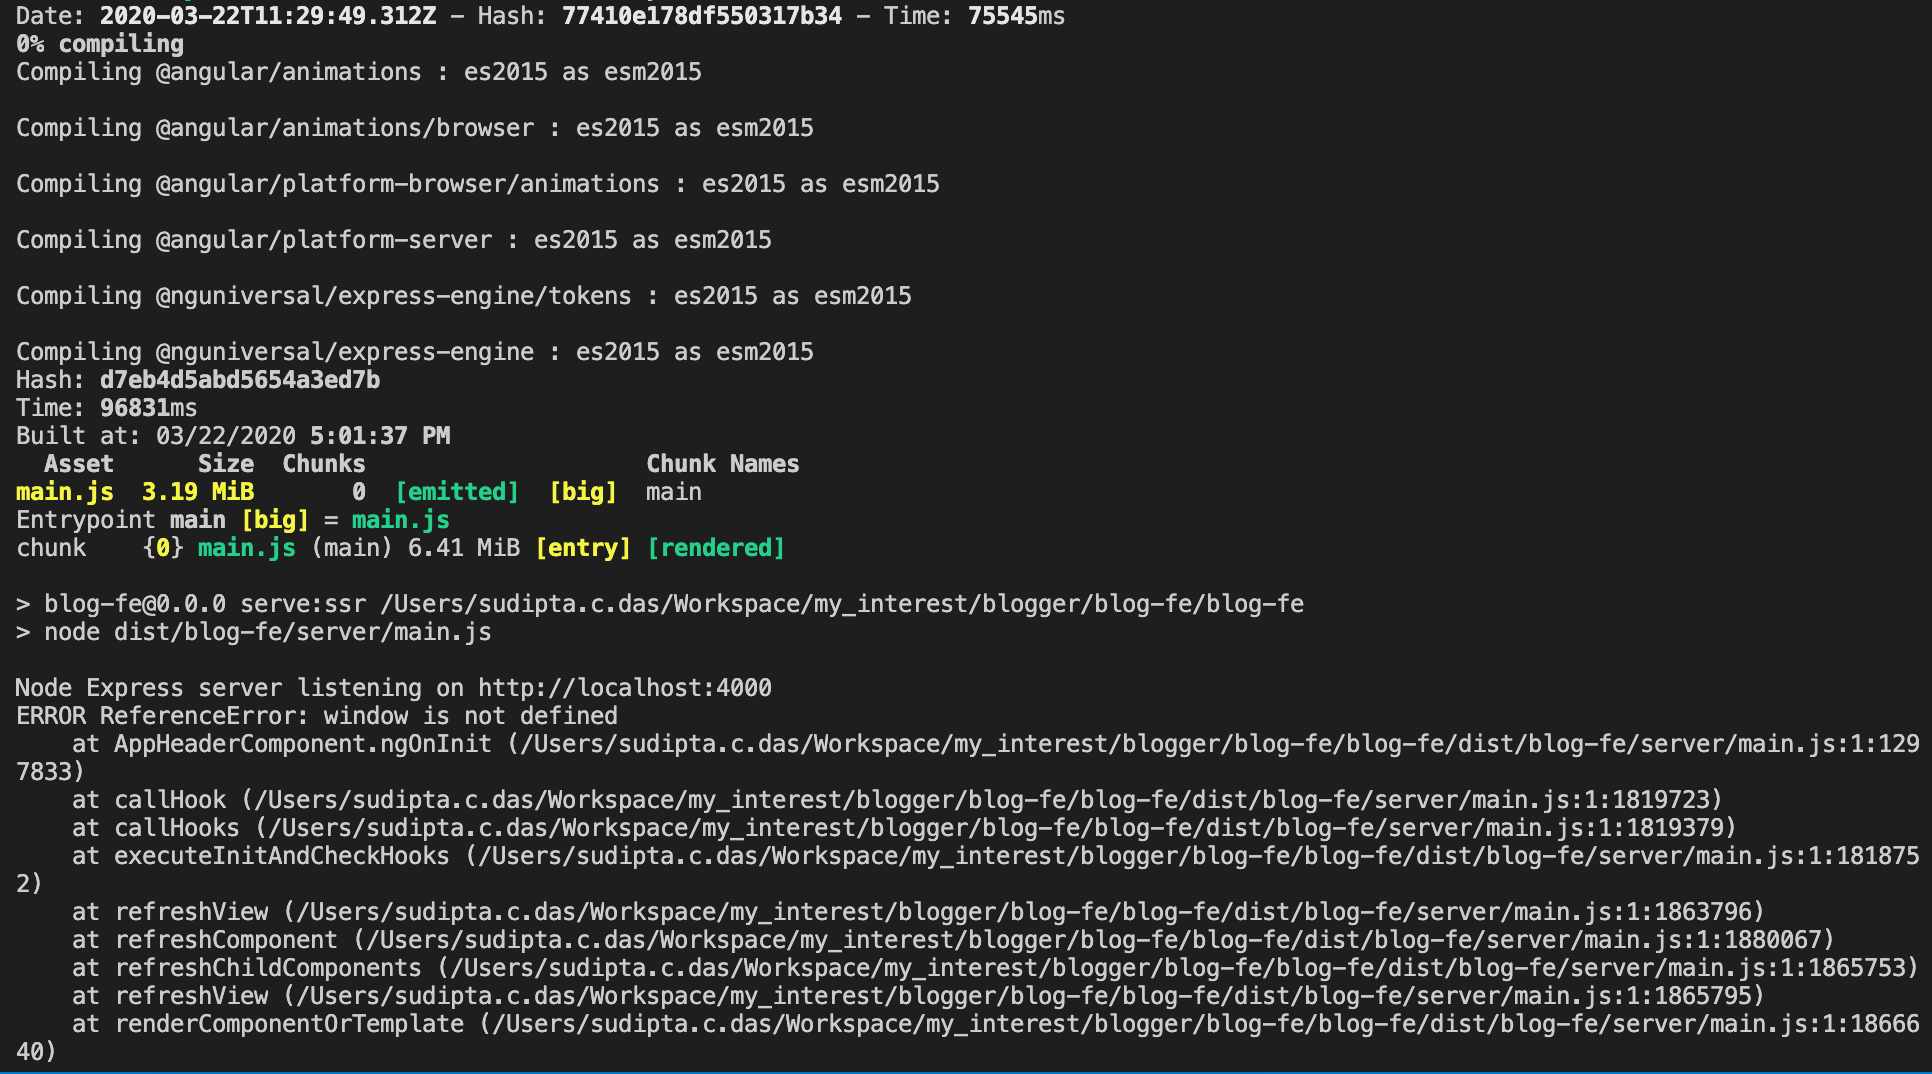
During this command, you might get the following error -


     Node Express server listening on http://localhost:4000

     ERROR ReferenceError: window is not defined

To solve this error, you need to modify few code in server.ts file - (A complete server.ts file, you can copy entire one)

import 'zone.js/dist/zone-node';

import 'reflect-metadata';


import { enableProdMode } from '@angular/core';

import { ngExpressEngine } from '@nguniversal/express-engine';

import * as express from 'express';

import * as cors from 'cors';

import * as bodyParser from 'body-parser';

import { join } from 'path';

import expressStaticGzip from 'express-static-gzip';


import { AppServerModule } from './src/main.server';

import { APP_BASE_HREF } from '@angular/common';

import { existsSync } from 'fs';


const domino = require('domino');

const fs = require('fs');

const path = require('path');

const compression = require('compression');

const template = fs.readFileSync(path.join('.', 'dist/blog-fe/browser', 'index.html')).toString();

const win = domino.createWindow(template);


// tslint:disable-next-line:no-string-literal

global['window'] = win;


// tslint:disable-next-line:no-string-literal

global['document'] = win.document;


// tslint:disable-next-line:no-string-literal

global['DOMTokenList'] = win.DOMTokenList;


// tslint:disable-next-line:no-string-literal

global['Node'] = win.Node;


// tslint:disable-next-line:no-string-literal

global['Text'] = win.Text;


// tslint:disable-next-line:no-string-literal

global['HTMLElement'] = win.HTMLElement;


// tslint:disable-next-line:no-string-literal

global['navigator'] = win.navigator;


// tslint:disable-next-line:no-string-literal

global['MutationObserver'] = getMockMutationObserver();


function getMockMutationObserver() {

return class {

observe(node, options) {

}

disconnect() {

}

takeRecords() {

return [];

}

};

}


enableProdMode();


// The Express app is exported so that it can be used by serverless Functions.

export function app() {


const server = express();

const distFolder = join(process.cwd(), 'dist/blog-fe/browser');

const indexHtml = existsSync(join(distFolder, 'index.original.html')) ? 'index.original.html' : 'index';


server.use(cors());

server.use(bodyParser.json());

server.use(bodyParser.urlencoded({ extended: true }));


server.use(compression());

server.get('*.*', expressStaticGzip(distFolder, {

enableBrotli: true,

orderPreference: ['br', 'gz']

}));

server.get('*.*', express.static(distFolder, {

maxAge: '1y'

}));


server.engine('html', ngExpressEngine({

bootstrap: AppServerModule

}));


server.set('view engine', 'html');

server.set('views', distFolder);


server.get('/redirect/**', (req, res) => {

const location = req.url.substring(10);

res.redirect(301, location);

});


// All regular routes use the Universal engine

server.get('/*', (req, res) => {

res.render(indexHtml, { req, providers: [{ provide: APP_BASE_HREF, useValue: req.baseUrl }] });

});


return server;

}


function run() {

const port = process.env.PORT || 4000;


// Start up the Node server

const server = app();

server.listen(port, () => {

// console.log(`Node Express server listening on http://localhost:${port}`);

});

}


// Webpack will replace 'require' with '__webpack_require__'

// '__non_webpack_require__' is a proxy to Node 'require'

// The below code is to ensure that the server is run only when not requiring the bundle.

declare const __non_webpack_require__: NodeRequire;

const mainModule = __non_webpack_require__.main;

const moduleFilename = mainModule && mainModule.filename || '';

if (moduleFilename === __filename || moduleFilename.includes('iisnode')) {

run();

}


export * from './src/main.server';


Then run again and have a look at the browser tab – http://localhost:4000 the application will run smoothly.


Note: If your application is using localHost, another issue you might face

 
ERROR ReferenceError: localStorage is not defined

Use the following steps to overcome the issue:

1. Inject the following service in the constructor

@Inject(PLATFORM_ID) private platformId: object

2. Import missing dependencies

import { Injectable, Inject, PLATFORM_ID } from '@angular/core';

3. use the code snippets

let token = '';

if (isPlatformBrowser(this.platformId)) {

token = localStorage.getItem('access_token');

}

4. build and run 


Step 8: ping your sitemap.xml file to google or bing from your web browser.

You can use it to ping your sitemap from the below endpoint.

http://www.google.com/webmasters/sitemaps/ping?sitemap=URLOFSITEMAP
http://www.bing.com/webmaster/ping.aspx?siteMap=URLOFSITEMAP

Step 9: Last but not least, you can leverage Google search API to crawl your page.

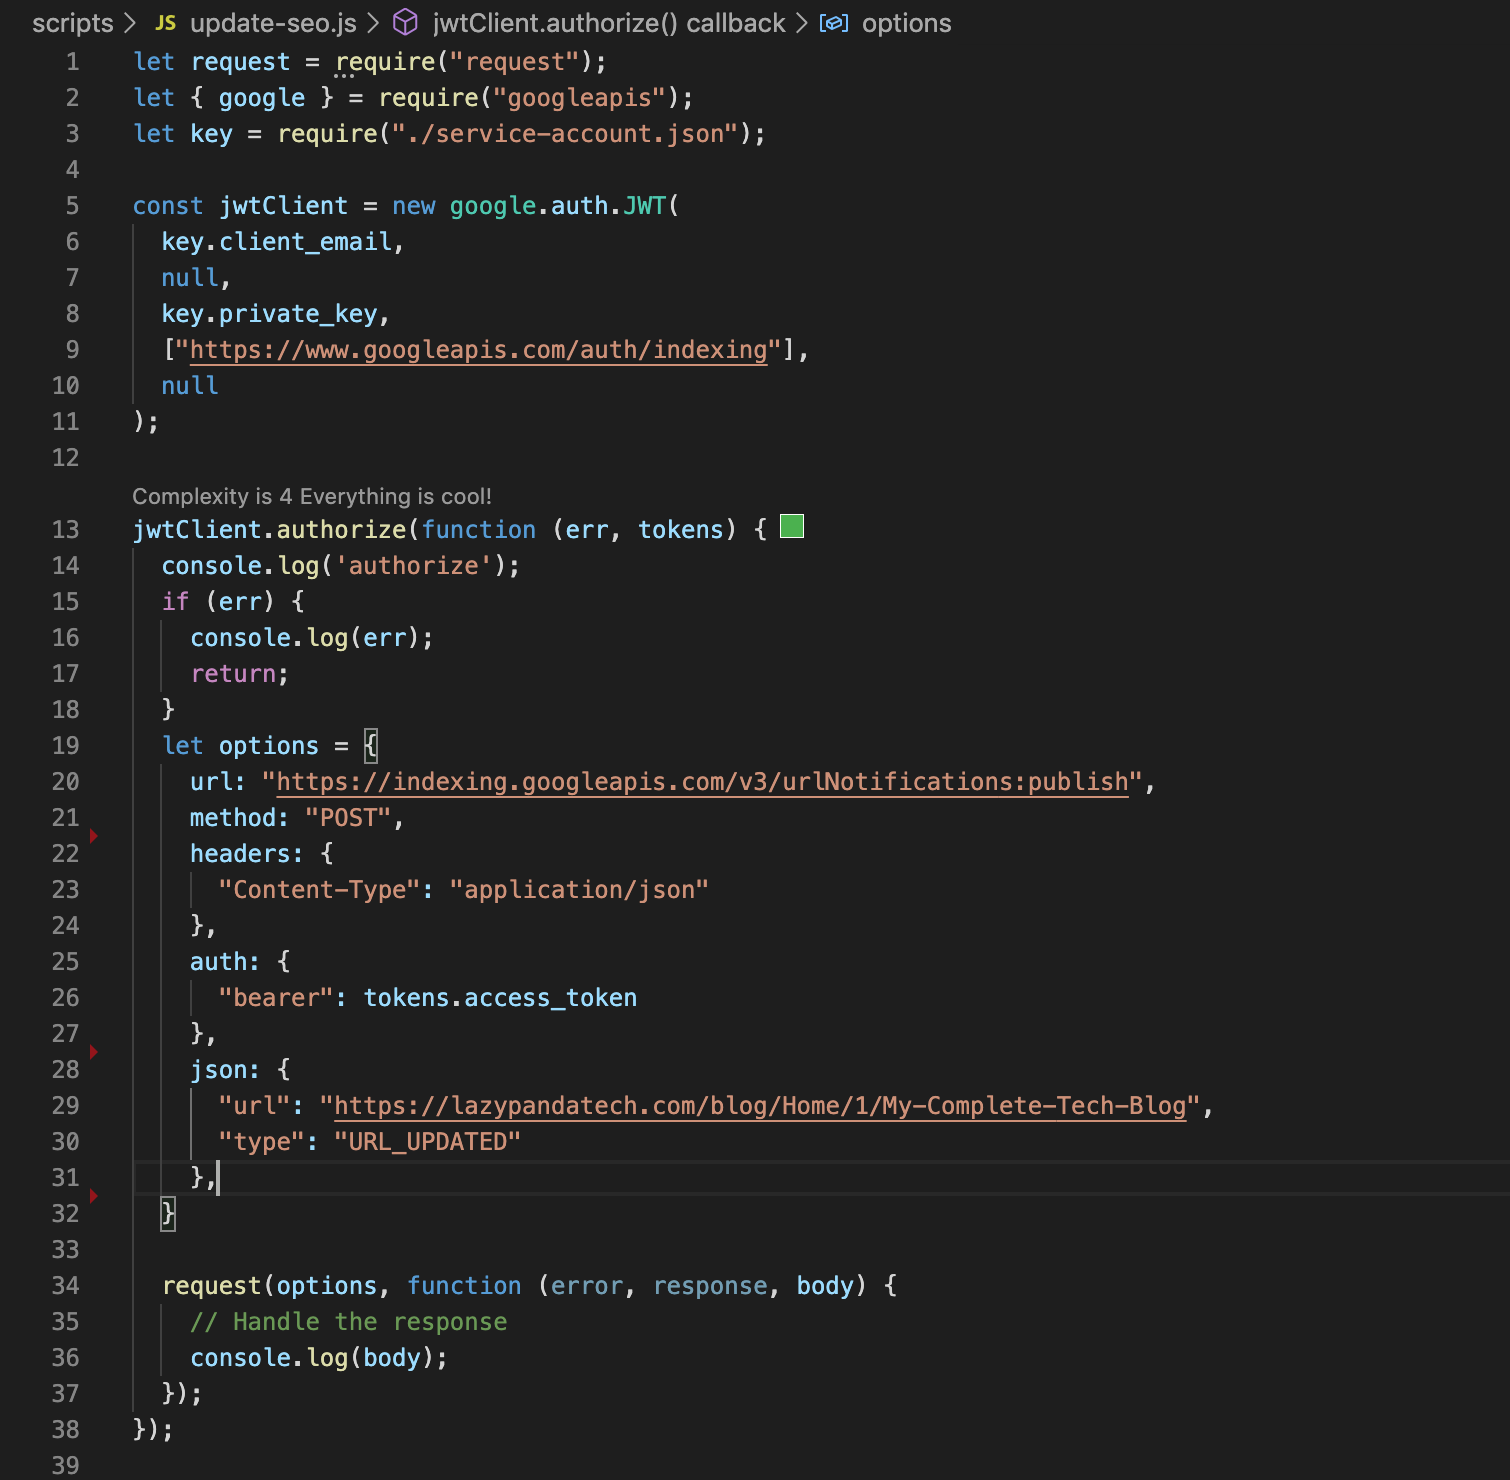
Google search API is another way to make sure your page will be crawled in the next 48 hours (probably). To use the Google search API you need to create one service account followed by enabling Search API too. The complete documentation is here. You can use the automated API console to submit your endpoint, but I would suggest creating one service account adding yourself as an owner, and writing a simple node js application to submit your endpoints. 

The nodejs script which I have used to submit my endpoints is like this below -

seo-google-search-api

Hope you enjoyed the article if you have any other suggestions please comments below.

Good Luck & Happy Coding!

- Lazy Panda Tech