Angular ng-template ng-content and Content Projection with real-time example
While developing any solution, most of us are concern about code reusability and optimization to reduce less error and high performance. One of the Angular features that help us to build reusable components is Content Projection using ng-content. In this blog, I am going to explain how we can achieve with the Component design.
What is Content Projection and How it works?
Content Projection: It is very useful to insert a shadow DOM into a component. To insert HTML elements or other components in a component, you need to use content projection.
Let's have a look simple code snippets.
<app-widget-container>
<div><h1>This is widget title</h1> </div> This particular <div> will not be shown in UI, unless you build the Content Projection
</app-widget-container>
So, to achive that, you need to modify component design structure in order to make it works.
AppComponent.ts
<app-widget-container>
<div><h1>This is widget title</h1> </div>
</app-widget-container>
WidgetComponent.ts
<div>
<ng-content></ng-content>
</div>
This time, the text written under <app-widget-container> tag will be going to show in UI. This is called Single-Slot Content Projection.
Likewise, there is a Multi-Slot Content Projection is there, in this case, a component accepts content from multiple sources.
AppComponent.ts
<app-widget-container>
<div><h1>This is widget title</h1> </div>
<div><p>This is a sample description</p></div> Expectation is to add this two div in different secion in UI.
</app-widget-container>
So, to achive that, you need to modify component design structure in order to make it works.
WidgetComponent.ts
<div>
<ng-content select="h1"></ng-content>
<div>
<ng-content select="p"></ng-content>
</div>
</div>
For more details, please check out https://angular.io/guide/content-projection
Example on Content Projection
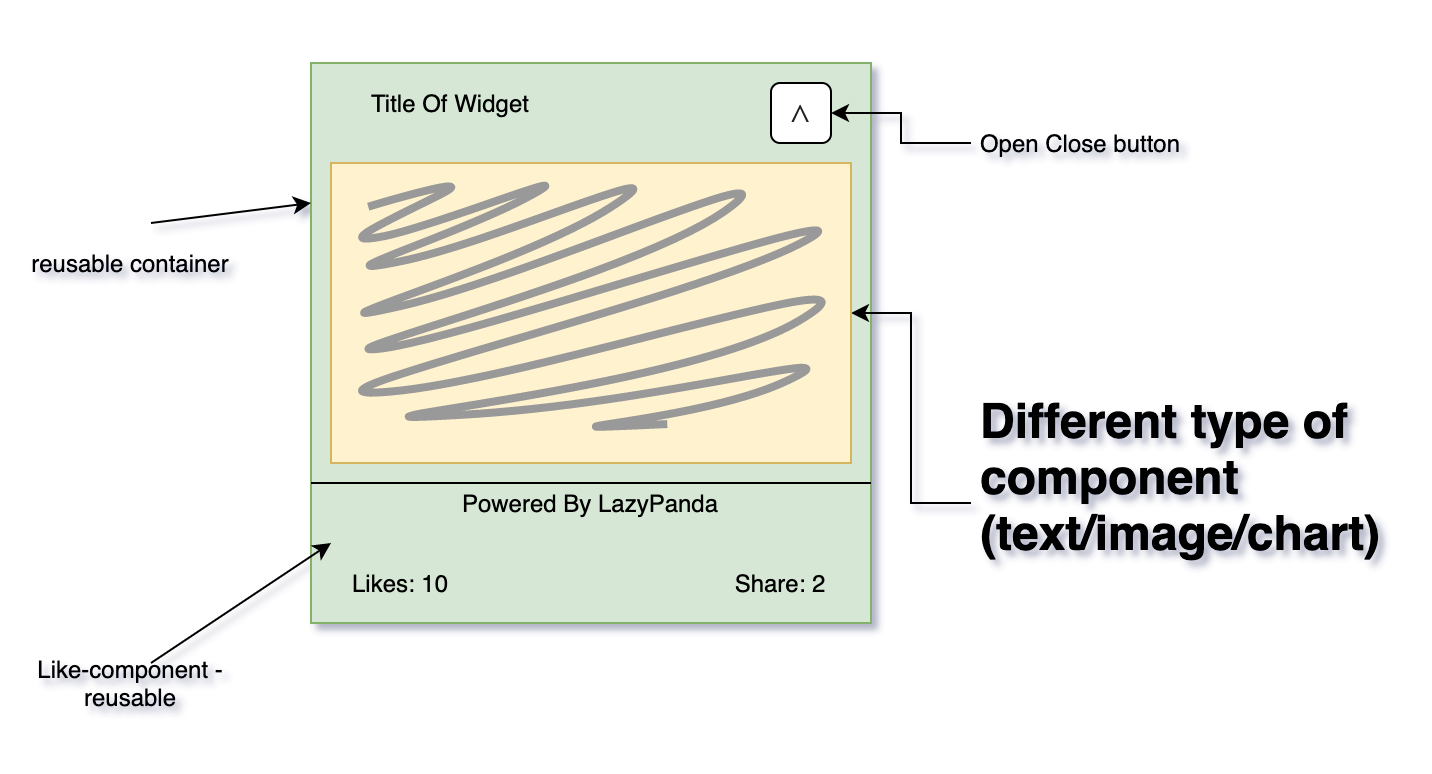
What I am going to build (mockup).
So from the above mockup, the container (title, button), below like & Share should be reusable and the middle section should be dynamic. But when the user opens and closes the widget the component should be initialized and destroyed accordingly.
A data source defines different types of widget types, and based on each type-specific component (either TextComponent or ImageComponent) has been projected. LikeAndShareComponent has been reused for every widget.
Demo Time:
Explanation:
In AppComponent.ts file, different component (Text or Image Component) has been passed based on the type and that is bounded by ng-template. With an ng-template element, you can have your component explicitly render content based on any condition you want, as many times as you want. Angular will not initialize the content of an ng-template element until that element is explicitly rendered. That's why each type of component has been wrapped with type conditions.
<ul>
<li *ngFor="let widget of widgetDataSource">
<div *ngIf="widget.type === 'text'">
<app-widget-container [widget]="widget">
<ng-template>
<app-text-widget textToShow="{{ widget.value }}"></app-text-widget>
<app-like-share-ui likesData="{{ widget.likes }}" shareData="{{ widget.share }}"></app-like-share-ui>
</ng-template>
</app-widget-container>
</div>
<div *ngIf="widget.type === 'image'">
<app-widget-container [widget]="widget">
<ng-template>
<app-image-widget imageSrc="{{ widget.value }}"></app-image-widget>
<app-like-share-ui likesData="{{ widget.likes }}" shareData="{{ widget.share }}"></app-like-share-ui>
</ng-template>
</app-widget-container>
</div>
</li>
</ul>
Next, while reading the WidgetContainer Component, it has ng-container which acceps ng-template as a source to render in UI.
<div>
<div style="display: flex;">
<h4 style="margin-block-start: 5px;margin-block-end: 5px;">Widget's Card</h4>
<button style="margin-left: auto;" (click)="toggoleWidgetDetails()">{{ label }}</button>
</div>
<div *ngIf="widget.visible">
<ng-container [ngTemplateOutlet]="contentTemplateRef"></ng-container>
<ng-content select="app-like-share-ui"></ng-content>
</div>
</div>
This example uses the ngTemplateOutlet directive to render a given ng-template element, which has been defined in Component.ts file as a ContentChild. That can be applied as ngTemplateOutlet directive to any type of element. This example assigns the directive to an ng-container element because the component does not need to render a real DOM element.
Component.ts
@ContentChild(TemplateRef) public contentTemplateRef!: TemplateRef<any>;
Content projection is very useful to insert shadow DOM in your components. In AngularJS 1.X, the content projection was achieved using Transclusion. However, in Angular, it is achieved using <ng-content>.
Happy Coding!
-LP


Loading comments...